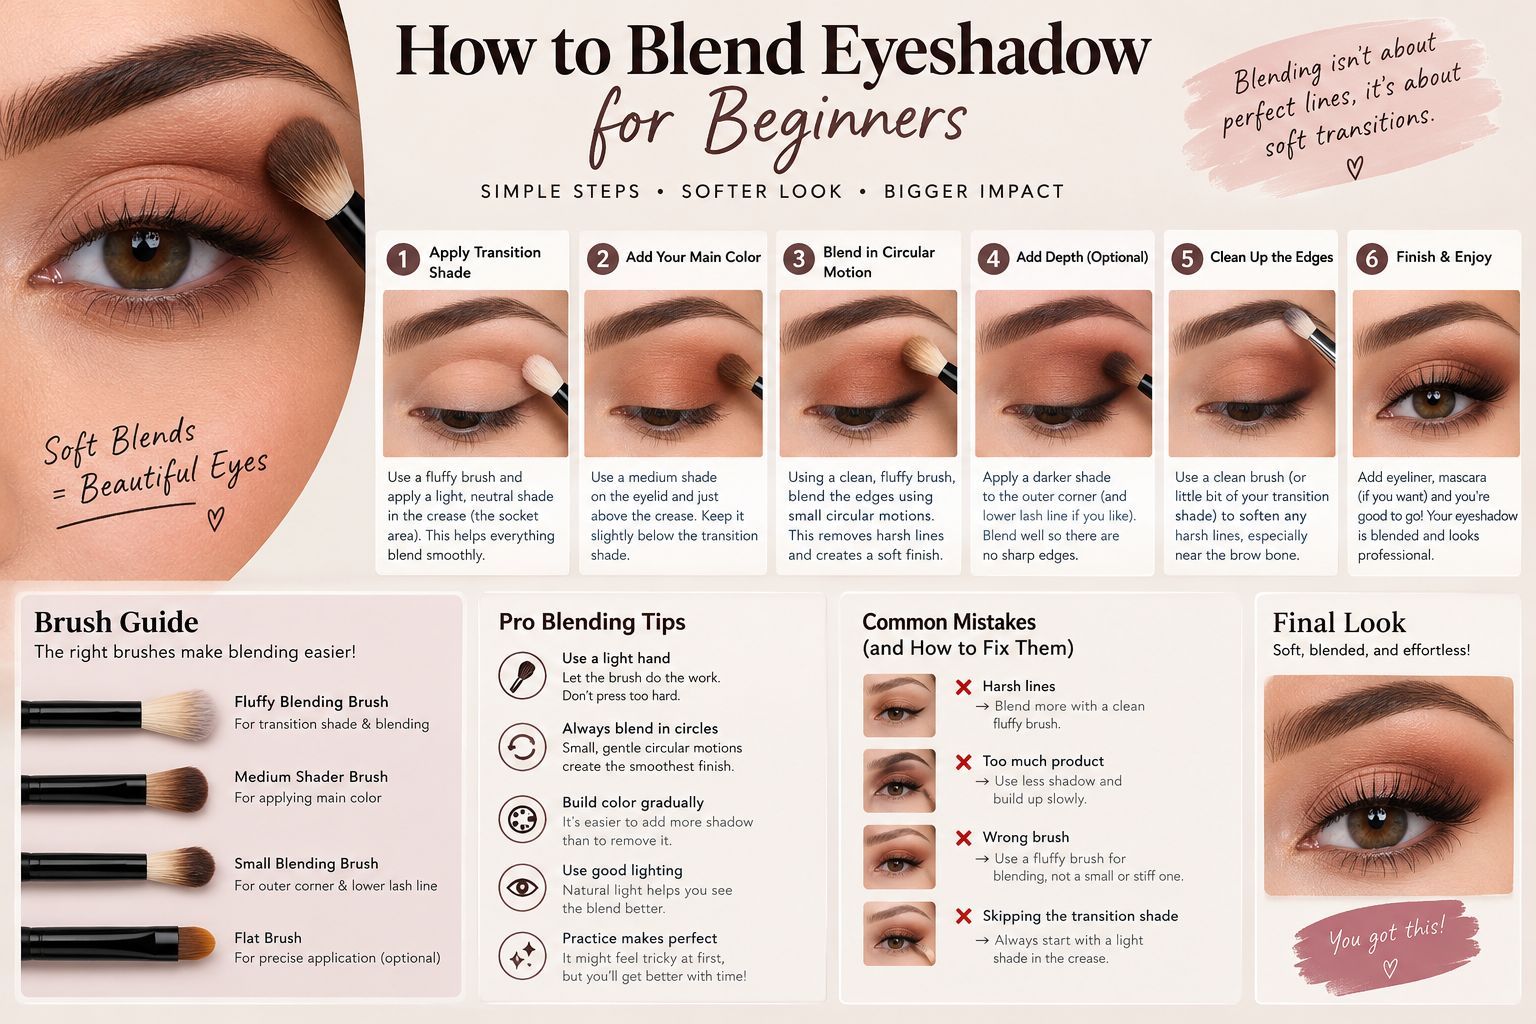
Quick answer: To blend eyeshadow, prime your lids, sweep a pale transition shade through the crease with a fluffy brush, add a deeper shade in small layers using small windscreen-wiper motions, and keep blending until no edge is visible. Use light pressure and build colour gradually instead of packing it on.
Key takeaways
- Two brushes are enough: a fluffy blending brush and a flat shader.
- Always start with a pale transition shade, then add darker colour in thin layers.
- Light pressure and small, soft motions blend better than scrubbing.
- Most blending problems come from too much product or too little primer.
- A clean brush blends better than a loaded one, so keep a spare for blending only.
If your eyeshadow looks more like a bruise than a gradient, you’re in good company. Blending is the skill that separates a patchy eye from a soft, polished one, and it’s the part of makeup beginners most often struggle with. The good news is that it isn’t talent. Learning how to blend eyeshadow for beginners comes down to technique and a handful of habits.
Instead of starting with a long tutorial, let’s start with what’s going wrong. Find your problem below, and the fix will point you to the right step.
What’s going wrong with your eyeshadow?
“I can see a harsh line where the colour stops.” You haven’t built a transition. A pale shade in the crease softens that edge.
“My eyeshadow looks muddy and brown.” You’ve probably blended too long with too much product, or combined colours that mix badly. Stop blending when the colour looks smooth.
“The colour looks patchy.” You need a base. Primer or a skin-toned shadow on the lid helps powder grip evenly.
“It all falls onto my cheeks.” You’ve loaded the brush too heavily. Tap it off first, and do your eyes before your base makeup, or place a tissue under your eyes.
“It disappears after an hour.” No primer, or oily lids. Primer and a light dusting of powder help.
If one of these sounds familiar, the steps below will fix it.
What you need to blend eyeshadow
You don’t need a twenty-piece brush set. Here’s the short list.
- A fluffy blending brush. Soft, rounded and loose bristles that sweep colour smoothly. This is the most important tool you own for blending.
- A flat shader brush. For packing colour onto the lid.
- An eyeshadow primer. It gives powder something to grip and stops creasing. A dab of concealer set with powder works in a pinch.
- A neutral palette with at least three shades. A pale matte for the transition, a mid-tone for the crease and a shimmer or deeper shade for the lid.
- A clean spare brush, if you can, kept just for the final blend.
Most beginner palettes come with a guide on the back that shows where each shade goes. If yours has one, follow it for the first few attempts.
Brush care matters
Clean brushes blend better, because old product builds up and drags colour. They’re also safer. The FDA says to wash your hands before applying eye makeup and keep any tools you use near your eyes clean, and never to share eye products with others. Wash your brushes with a gentle shampoo or brush cleanser every week or two, reshape the bristles and let them dry flat.
How to blend eyeshadow for beginners: seven steps
Set aside ten minutes. Sit at a table with good light and rest your elbow on it, so your hand stays steady.
Step 1: Prime
Tap a small amount of primer over your whole lid, up to the brow bone, and let it set for thirty seconds. Skip this and you’re asking powder to stay put on bare skin.
Step 2: Apply your transition shade
Take your fluffy brush and pick up the palest matte shade, ideally one just slightly deeper than your skin tone. With your eyes open and looking straight ahead, sweep it back and forth through the crease in small windscreen-wiper motions. This is your insurance. Even if the darker colours aren’t perfect, the transition shade softens everything.
Step 3: Add the lid shade
Use the flat shader to press a lighter or shimmery shade onto the lid. Press, don’t swipe. Pressing keeps more pigment on the lid and reduces fallout.
Step 4: Deepen the crease
Take your mid-tone shade on the fluffy brush and tap off the excess. Place it at the outer part of your crease, the area closest to the temple, and blend it inward with small back-and-forth movements. Focus on the outer third first. You can always add more towards the centre.
Step 5: Add depth to the outer corner
If you’d like more definition, use a deeper matte shade on a smaller brush. Place a little in the outer corner in a soft V-shape and blend towards the crease. Keep it small. This is where muddy eyes happen.
Step 6: Blend, then blend again
Take a clean fluffy brush and go over all edges with light pressure. Use tiny circular motions and gentle back-and-forth sweeps. Hold the brush at the end of the handle, which gives you a softer touch. Keep going until you can’t tell where one shade ends and the next begins.
Step 7: Clean up and highlight
Tap a little pale shade or highlighter on your inner corner and under the brow arch. Wipe away any fallout with a cotton bud or a piece of tape. Finish with mascara. That’s it.
Three ways to blend
There isn’t only one technique. Try all three and see which feels natural.
Windscreen-wiper motion
Short side-to-side sweeps along the crease, like a windscreen wiper. It builds colour gradually and softens edges. It’s the easiest method for most beginners.
Vertical blending
Using the same fluffy brush, make small up-and-down movements along the edge of the shadow, pushing the colour upwards into a soft haze. It’s good for lifting a harsh line into the brow bone area.
Finger blending
Warm cream shadows blend well with a fingertip, and the heat helps them melt into the skin. For powder, patting with a clean finger on the edge can soften a line. It’s less precise, but it works well for beginners who are still getting used to brushes.
Blending different shadow formulas
Powder: The easiest to blend, because it’s forgiving. Start light and build up.
Cream: Apply with fingers or a brush, then blend quickly before it sets. Set it with a matching powder to prevent creasing.
Glitter and shimmer: Press on top with a finger or a flat brush, rather than sweeping. Blend the edges, not the glitter itself.
Liquid shadow: Dot on, then blend with a fingertip straight away, since it dries fast.
Blending problems and how to fix them
Harsh lines
Take a clean fluffy brush, with nothing on it, and go over the edge in light motions. If the line is still visible, add a bit of your transition shade on top and blend again. A clean brush is often the most effective fix.
Muddy or brown colour
Stop blending. Too much movement mixes colours and turns them dull. Next time, apply fewer layers and let each shade sit in its own area. If it’s already muddy, add a little shimmer to the lid or a lighter shade on the brow bone to bring brightness back.
Patchy colour
Add primer first, and press colour on rather than sweeping. For stubborn patches, use a slightly damp flat brush to apply the shade, which deposits more pigment.
Fallout
Tap your brush against the back of your hand before it touches your eye. Apply eye makeup before foundation, or sweep fallout away with a clean brush or tape. Cream shadows reduce it further.
Creasing
Use primer, avoid oily eye cream right before makeup, and set the lid with powder. Thinner layers crease less than thick ones.
Blending on different eye shapes
Hooded eyes
Open your eyes and look in the mirror when placing your crease colour. The shade needs to sit slightly above your natural crease, so it’s visible when your eyes are open. Blend upwards and outwards, and use matte shades for definition.
Mature eyes
Choose matte or satin shadows over heavy glitter, since shimmer can emphasise texture. Use light layers and blend well, as heavy colour can settle in fine lines.
Small or close-set eyes
Keep colour light on the inner half and add depth to the outer corner. Use pale shadow in the inner corner to open the eyes.
Deep-set eyes
Use light and shimmery shades on the lid to bring it forward, and place darker shades slightly higher to avoid a hollow look.
Two easy looks to practise
Once you can blend, try these. For more beginner-friendly looks, including lips and base makeup, browse Glowing Magazine.
The soft neutral
- Primer all over.
- Pale matte through the crease.
- A warm taupe in the outer third of the crease.
- A champagne shimmer on the lid.
- Mascara.
The soft smoky
- Primer all over.
- Pale transition shade.
- A medium brown through the crease.
- A dark brown or charcoal pressed along the upper lash line and smudged out slightly.
- A little of the same shade along the lower outer lashes.
- Mascara.
Start light. You can darken it step by step.
Quick tips on how to blend eyeshadow for beginners
- Build, don’t pack. Thin layers blend more easily than one thick one.
- Light hand. If bristles splay out against your skin, you’re pressing too hard.
- Work in good light. Daylight shows the lines you can’t see in a dim bathroom.
- Blend in the direction you want colour to go. Up and out for lift.
- Take a step back. Look at the whole face, not just your eye.
- Don’t blend forever. Once it’s smooth, stop.
Frequently asked questions
Why won’t my eyeshadow blend?
Usually there’s too little primer, too much product or a brush that’s too small or dense. Try a fluffy brush, add a pale transition shade and apply colour in thin layers. A clean brush with no product on it often fixes a stubborn line.
What is the best brush to blend eyeshadow?
A soft, fluffy, rounded blending brush is the best choice for most people. It has loose bristles that sweep colour gently into the crease without leaving an edge. Pair it with a flat shader brush for applying colour to the lid.
Can I blend eyeshadow with my fingers?
Yes. Fingers work especially well for cream shadows because body heat helps them melt into the skin. For powder, they’re less precise, but a gentle patting motion can soften an edge. Make sure your hands are clean.
Do I need an eyeshadow primer?
It isn’t essential, but it helps. Primer gives powder something to grip, which makes colour look richer and reduces creasing and patchiness. If you don’t have one, a thin layer of concealer set with powder works well.
How long should I blend?
Only until the edge disappears, usually a minute or two per eye. Blending for too long mixes colours and can turn them muddy. Use light pressure, check your work in good light and stop when it looks smooth.
Conclusion
Blending is mostly patience and light pressure. Prime, start with a pale transition shade, build colour in thin layers and keep one clean brush for the final pass. Practise on the same simple look a few times, and your hands will do the rest.